Sunday, April 18, 2010

Using TextBuffer class to decode text

It is sometimes of great benefit to be able to identify certain patterns in a text and be able to extract certain information depending on the patterns found. X++ provides this by the power of the use of regular expressions.

For example, the match function in Dynamics Ax can be used to decide whether an item’s name contains a string that starts with a number followed by a string that contains at least two commas.
This pattern can be formulated as a regular expression in the X++ syntax as “:d+.*, .*, .*”. This patter is used in the example below.
 
match(":d+.*, .*, .*","14\", TV, Fixed stand")

The match function in the previous example returns 1, which means that the pattern was found.

The TextBuffer class is founded on the mechanism of the match function. Basically, the matching is triggered by calling the find method. If the pattern is found, the TextBuffer object stores two values that facilitate access to the matching substring, those being the match position (the beginning of the matching substring) and the match length (the length of the matching substring).

The following code example shows how to use the TextBuffer class to identify the presence of three different patterns with special delimiters in an item’s description, namely:

  • conf|.*|: Substring starting with “conf|” and ending with “|”.
  • col|.*|: Substring starting with “col|” and ending with “|”.
  • size|.*|: Substring starting with “size|” and ending with “|”.
These special delimiters are used in a way to locate the configuration, color and size of an item.

The following three steps describe how this is done:

  1. Call the find method to trigger the matching.
  2. Use the matchPos and matchLen methods to locate the matching substring (if any).
  3. Extract the matching substring.
  4. Display the matching substring.
  5. Replace the matching substring with an empty string to remove it from the original text.
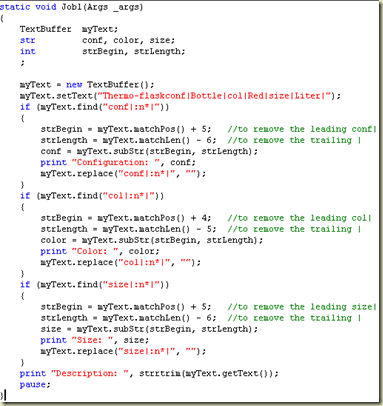
Finally, the remaining string (which is the description of the item) is displayed. Note that the strrtrim function is used to remove any trailing spaces from the description of the item.

 image 

Monday, April 12, 2010

Render financial statements into graphs

One of our customers required a visualization of the financial data generated by the system to make it easier for top management to see the trends and indications from the data.
We decided to render the output of the financial statement reports into a spreadsheet activex control similar to that of the "Graph of balance" which could be found in the chart of accounts details form (Balance --> Graph of balance).

Our approach goes as follows:
  1. Add a new output type to the financial statement.
  2. Create a new form that displays the graph generated by the rendering class.
  3. Create a class that performs the rendering.
  4. Modify the LedgerBalanceSheetDimPrint class so that the new form is called when the chosen output type is "Graph".
Adding a new output type

This is simply done by adding a new element to the BaseEnum that appears in the form (namely, DimensionsOutputType).

Form to display the generated graph

You can duplicate the "Graph of balance" form, or if you're comfortable with using the Graphics class then you can create a new form. The whole sotry lies in the loadData method of the graph object that you create. You can choose whether columns should be on the XAxis and rows on the YAxis or vice versa (it is even better to parameterize this option) in a way such that financial statment column labels and row labels are used as axis labels (make sure to truncate the names because they are too long and would impair the display of the graph).

Class to manage the graph rendering

We have created a new class similar to LedgerBalanceSheetDimFile (the class used to export the financial statement into files). This way it becomes easier to manage the output of the graph in terms of graph options with relation to the financial statement parameters (which column goes to which axis, what type of graph ... etc.).

Modify the LedgerBalanceSheetDimPrint class

This is where everything starts. However, the changes that need to be made here are minimal (which is very convenient in the case of an upgrade). The changes that will be made to this class occur in the run method and a new method to call the form that displays the graph.

In the run method add a new case to the switch statement that decides what output type has the user chosen for the financial statement.


The runGraph method should be similar to the runReport method the only difference being that it calls a form instead of a report.


Now, your financial statement is ready to display a simple financial statement in nice looking graph.


Please follow this link for the code sample

Sunday, April 11, 2010

Introduction

Hi all,

My name is Fato. I work as MS Dynamics AX developer since 2007. During this time, I have been through good and bad days, and in the bad days I was many times saved by the knowledge of a generous person whom I didn't know and who is willing to share. I have grown tremendous appreciation for them and thought that the least I could do to honor their work is to extend it myself. Hence, I'm starting this blog for the hope that someday, somewhere, someone will make use of what I have to share.

Regards,